Happy November! Can you believe we already in November? Where does the time go? It's that time for another tutorial.... and in true fashion, I'm bringing you a tutorial that is inspired by a paper layout.
This month, it's all about the stitches! So, I know how to sew and I've made my own clothes, kids clothes, etc, but I HATE sewing UNLESS, it is sewing paper. As you are probably aware by now, I love paper crafting with a mixed media approach. Using stitching in layouts is something that I absolutely loved to do and always had to be sure I didn't use it all the time or with great variation to prevent my pages from looking all the same. If you hate sewing or don't know how to sew.... I have GREAT news for you. Do it digitally! I am going to scraplift this paper layout by Paige Evans and show you how I achieved a similar look digitally.
I started with a 12x12 canvas in PSCC. To make it easier to see the stitching as we work with it, I did start with a back ground paper.
With my background in place, I used the "triangle tool" (sometimes this is automatically defaulted to a rectangle" and created a triangle that covered half of my layout on a diagonal flow.
I then clipped the same background paper to this triangle (as you may notice, my triangle "pops" off the page a bit due to a drop shadow that was added).
The next many steps will cover the layers of stitching used to create the look. Before I place the stitching, here are a few things to keep in mind:
- Any stitching that is placed on the triangle shape layer, will be placed on this triangle diagonally.
- All stitching has a slight drop shadow added (I added this once the thread was positioned to my liking).
- All stitching has a bevel & emboss style I applied. I did this as it made the threads appear slightly raised on the background paper
and I felt it give a more realistic stitch effect.
- I used the following parameters on my bevel & emboss style: (I added this once thread was positioned to my liking)
style: Outer Bevel
Technique: Smooth
Depth: 95%
Size: 4px
Soften:4 px
Shading Angle: 90%, with global light checkmarked
highlight mode: screen
shadow mode: multiply
- I applied a color overlay to each thread with shades that matched the papers/elements that was utilized. When I want to make sure that my recolor matches the kit/papers, etc that I'm using, I will at times drag in a Designers preview to utilize it for color matching.
To add a color overlay, I make sure the layer/element etc that I want to recolor is selected and I click on the "layer style" (fx) at the bottom of the screen..
A menu option should appear, select "color overlay"
Your screen should pop up with this option/style box. Making sure that "Color overlay" is highlighted on the left, in the middle blend mode should be set to normal and if you click on the "colored box-orange in this screenshot) you will then have the option to select a color.
This is what the color selection box should look like. You will see, I drug my box up so that I could see the paper preview from the paper pack.
When you move your cursor off the various shades of orange, color dropper should appear. I then place that dropper over the color I want to match from my preview and click that color. Once I click that color, you will see the color change in the "new section" of the color picker screen and you can also see what color you changed from. By clicking "ok" I accept the color change. The next screen is essentially asking me to confirm the color change and I would select "ok" here too.
These last few steps have been about when I added the drop shadow, adding the bevel/emboss layer style and adding the color style. Feel free to refer back to these steps when you try this on your own. While I won't specifically spell out the above steps, when I add the stitching layers, please know that these steps were utilized.
Starting with the upper left corner of the layout.
***Please keep in mind, that the stitching I'm showing you has had a drop shadow, bevel & emboss style & color overlay added already, I'm listing the specific file name of the threads to share exactly what I used.***
For my first round of stitches, I added them in this following order (remember, starting in the top of left corner working towards the middle of the page):
1.
prd_Stunningstitchesno5_08.
2.
prd_Stunningstitchesno6_04.
3.
prd_Stunningstitchesno6_10.
4.
prd_Stunningstitchesno4_07.
5.
prd_Stunningstitchesno7_06. **Please note, I did stretch this stick out, so that the spacing in between would be larger**
6.
prd_Stunningstitchesno6_02.
7.
prd_Stunningstitchesno6_08.
8.
prd_Stunningstitchesno6_11.
9.
prd_Stunningstitchesno8_13_interlock.
10.
prd_Stunningstitchesno7_05. **Please note, I had to duplicate the stitch and place side by side to obtain the desired length**
11.
prd_Stunningstitchesno6_06.
12.
prd_Stunningstitchesno9_12.
13.
prd_Stunningstitchesno7_06. **Please note, I had to duplicate the stitch and place side by side to obtain the desired length**
14.
prd_Stunningstitchesno7_03.**Please note, I had to duplicate the stitch and place side by side to obtain the desired length**
15.
prd_Stunningstitchesno4_012. **Please note, I had to duplicate the stitch and place side by side to obtain the desired length**
16.
prd_Stunningstitchesno6_03. **Please note, I had to duplicate the stitch and place side by side to obtain the desired length**
17.
prd_Stunningstitchesno7_11. **Please note, I had to duplicate the stitch and place side by side to obtain the desired length**
18.
prd_Stunningstitchesno6_03. **Please note, I had to duplicate the stitch and place side by side to obtain the desired length**
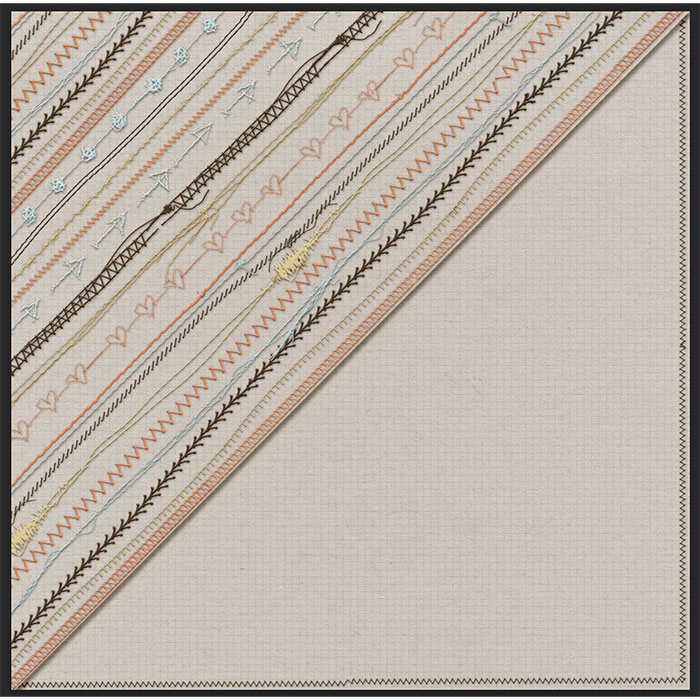
As you can see, my first round of stitches covered about ¾ of the large triangle piece. To help with filling the remaining section up, I selected the first 9 rows of stitching.
Now that I have them selected I duplicated them by selecting "contrl/command J" or by right clicking and selecting duplicate. If you look, the duplicated rows are slightly darker.
The duplicated rows are still highlighted. With them highlighted, if I press down on the control/command key, I can grab the highlighted rows and move down to the empty space.
I know things look a little crazy, the next step is to to go row by row of stitching and duplicate the stitching to finish filling up each row and then just tweak the placement. After I duplicate to finish each row up and tweak the placement, this is what that triangle area now looks like.
I have a little more stitching to add. I wanted to have stitching along the right side and the bottom of the layout. The stitching that I used for this is
prd_Stunningstitchesno7_06From here, I then completed the rest of my layout using the designs mentioned above. Here's what my completed layout looks like.
If you compare this with the layout that I lifted, you can see that it is possible to achieve very similar stitching effects digitally. The beauty of this is you can opt to use any stitching that meets you choose.
Can't wait to see what you come up with. I hope that you will give this look a try and can't wait to see you create.
xxxxx,
Esther