HAPPY NEW YEAR!!!! Can you believe we are a new a Brand New Year? It almost seems surreal. I sure did have a little laugh the other day, as my oldest is 17 and he made the comment, “man, the year just seems to go by faster than it used to!” Of course me being a mom, I reminded him that it sure does and just wait and see how much faster it goes the older you get with more responsibility. LOL.
Speaking of the New Year. . . . for many that mean’s new goals. I generally do NOT do any New Year’s Resolutions as I always tend to fall off the band wagon when they are “labeled” as New Year’s Resolutions. So while, I don’t have any New Year’s Resolutions, I do have some goals and some of my goals fall in the creative realm. Just hang with me for a minute. You will get to see those goals in a bit (just in case you are curious, if you aren’t that’s ok to… LOL).….BUT first, I want to bring another paper crafting skill to you and turn it digital.
Anybody like cut files? Anybody who knows me marginally well, has probably already picked up on the fact that I own several die-cutting/paper crafting machines and I’m always looking for the next one to add to my every growing gadget options. Many who cross over digitally, may at times struggle to find that one paper craft “thing” that they miss in the digital world. My tutorial for this month, is to show you how you can make your word art look like a cut file. It’s a super easy way to give the page some “wow” and you can go as basic as you want or completely go crazy and add all the elements you want. It’s so versatile that you can reuse the concept over and over to create your own custom looks.
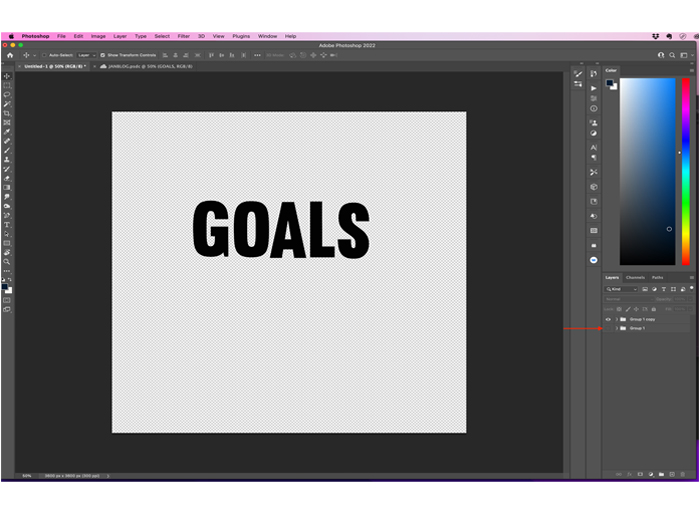
***this tutorial is created is using PSCC2021 with a 3600x3600 px canvas, drop shadows are used to varying degrees in my my layout but not specifically addressed in this tutorial**** I’m starting with a blank canvas in Photoshop. I have my Photoshop set up to where most of my tools fall on the left hand side of my screen. While your tools may not be set up exactly the way mine are, this should help guide in the right direction.
1. First, I want want to add a text box.

2. Once I add my text box, I then go to my “text” tool and select the alpha I want and adjust the size of the font. For this tutorial, I am using a font called Brotherton and the size is 210 pt. I strongly recommend making the word art a dark color as it will help later on in the process. I chose black.
(When I use the cut file technique for word art, I tend to use bold chunky alphas, that is my personal preference. I encourage you to play around with different fonts and try this as I’m positive whatever you try it will be fabulous.)
3. With the text selected, I’m just going to type in my word art. EXCEPT, I want to type each letter in its own text box. I’m using the word “GOALS” and I’m typing them in all capital/upper case. To do this, I just type in the first letter, duplicate (control +J or CMD +J) and then type over the “G” make it an “O” and repeat for each letter. This is what my word art looks like so far.
(look at the layer section, you can see each letter is it’s own layer-I did this in case I want to clip paper to it later).
4. Before, I create the “cut file” look, I want to group these letters together and then duplicate them. To group, select all the layers that make up the word art.

5. Then hit “control +G or command +G” and these layers will be grouped together. This drop down arrow next to folder indicates that the slightly indented layers underneath it fall in this folder “group”.

6. Next step is to duplicate this group. With the group selected, I then hit “control +j or command +j”.

7. I don’t want the first group to show right now, so I’m going to click on the “eye” to hide it.
8. From here, I start adding the “stroke” to each letter. I do this by first selecting the letter I want to start with and then clicking the “fx” or function button.

9. After clicking the “fx” button, I want to select stroke.

10. I change the stroke color to “white” or the color of your choice, adjust the size of the stroke to 30px and the position to your preference for this tutorial, I chose “center”.

11. The first letter should look something like this.
(I added a colored layer for visual effects purpose only so that the difference is more visible).

12. Repeat steps 8-10 for the remaining letters and the letters should now look like this.

13. Next step is to isolate the stroke from the letter as a cut out as we are trying to create that cut file layered look. To do this, it’s best to convert each letter to a smart object first as it allows us to keep the stroke edge and then flattens it to where we can then rasterize and “delete” the fill easier.
14. To convert the letters to a smart object, select the letter in the layer section, right click and select “convert to smart object”

15. Repeat step 14 for each letter of your word art.
16. Now that each letter is a smart object, let’s rasterize each letter, select the letter in the layer section, right click and select “rasterize”

17. Repeat step 16 for each letter of your word art.
18. Next we are going to delete the fill. To do this, I select a letter and then select my “object selection” tool.

19. I take that “object selection” tool and make a rectangle close to the inside of my letter/object. It should then create the “marching ants” around the edge of black part of the letter.
(this is why I recommend a dark word art color, the contrast between the stroke and the fill makes it easier for the object selection tool to work). 
20. Once you see that the “marching ants” has selected the edges of the fill correctly, then just hit “delete” to get rid of the fill. Do this for each letter of your word art.
(tip: sometimes if a letter is acting a little tricky with me, I will do the object selection on just half of the letter and delete half of the fill at a time.)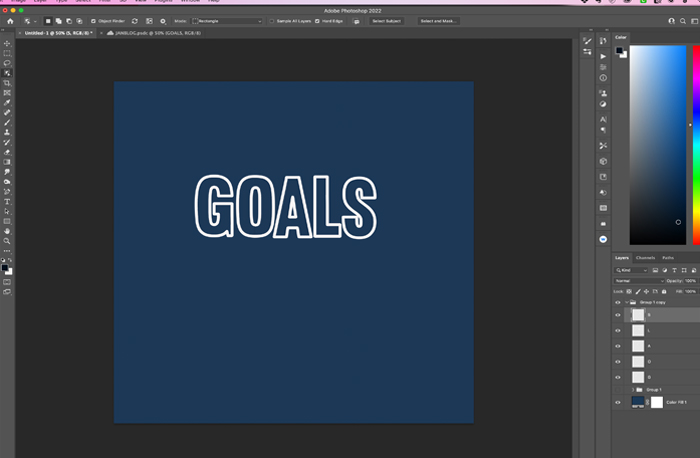
21. From here, it’s up to you what you do. You can clip papers to the border…. add drop shadows to it to make it pop a bit….or make your “hidden” group visible so that your
fill now shows again and clip different papers to your fill.

22. Here’s what I did with my word art, I combined it with on of Mir’s templates from her Brand New Year Collection and used the entire collection to create this photo less layout.

Can't wait to see what you try with this concept! Feel free to this concept with objects, elements etc.


