Curled Photo Edge with Age
Can you believe we are in September? It’s a little crazy! I don’t know about you, but even though I
LOVE digital scrapbooking, I still
LOVE paper scrapbooking. I don’t know that I will ever get 100% away from the paper side, it still calls to me. I love the textures, and I love to feel them. I will 500% admit that digital scrapbooking offers so many close alternatives that it would be silly for me to overlook them. My continued goal is to find ways to bring some of that “paper” feel to the digital world.
You ever noticed how your photos or papers start to curl over time? Well I’m going to show you how to create that effect digitally.
For this tutorial, I will bet using Photoshop CC. Since, this tutorial will be using a photo in a frame, I've decided to use Pink Reptile Designs Coffee O'Clock Collection including one of the templates.
I'm going to approach this from more of a layout perspective. I'm going to open Photoshop and open template No 4 in the template pack.

Since I want to see the "bent" photo effect in real time, I'm going to go ahead and insert a photo of choice into the frame and clip it to the mask.

Now, I'm going to show you how to achieve that "bent" look. This particular photo/template already has a nice square "filled" in mat. (If it didn't then I'd want to make my own photo mask the same size & then follow the below steps).

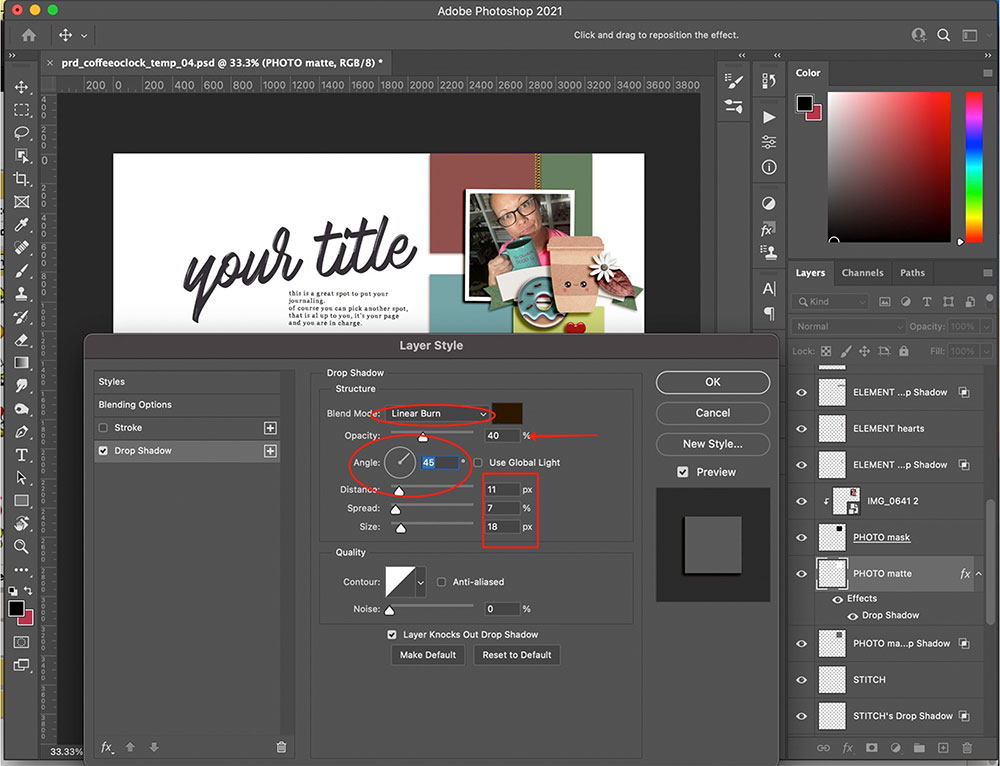
First thing I'm going to do, is select photo matte and add a drop shadow (I am aware that a shadow already exists for the photo matte and that one needs to remain there for it, the shadow I'm creating will be used to create the "bend" look). To add a drop shadow, click on the "fx" icon and select drop shadow.

The layer style screen should pop and look like this. I leave the blend mode as "linear burn," set the opacity to "40%", since the template already has a drop shadow angle being used at 45% I want to make sure I use the same angle of 45% for this shadow and I have distance @ 11, spread @ 7% and size @18 and click "ok."
When you first look, it doesn't look like anything changed. Take a closer look, the photo matte, is showing a "drop shadow" has been added.

The next step is to separate that "drop" shadow from the photo matte. To do this, make sure the photo matte layer is selected, right click on "drop shadow" and select the "create layer" option.

This lovely little message will pop up and it's just saying there are somethings that may not carry over by creating a separate layer. Just select "ok."

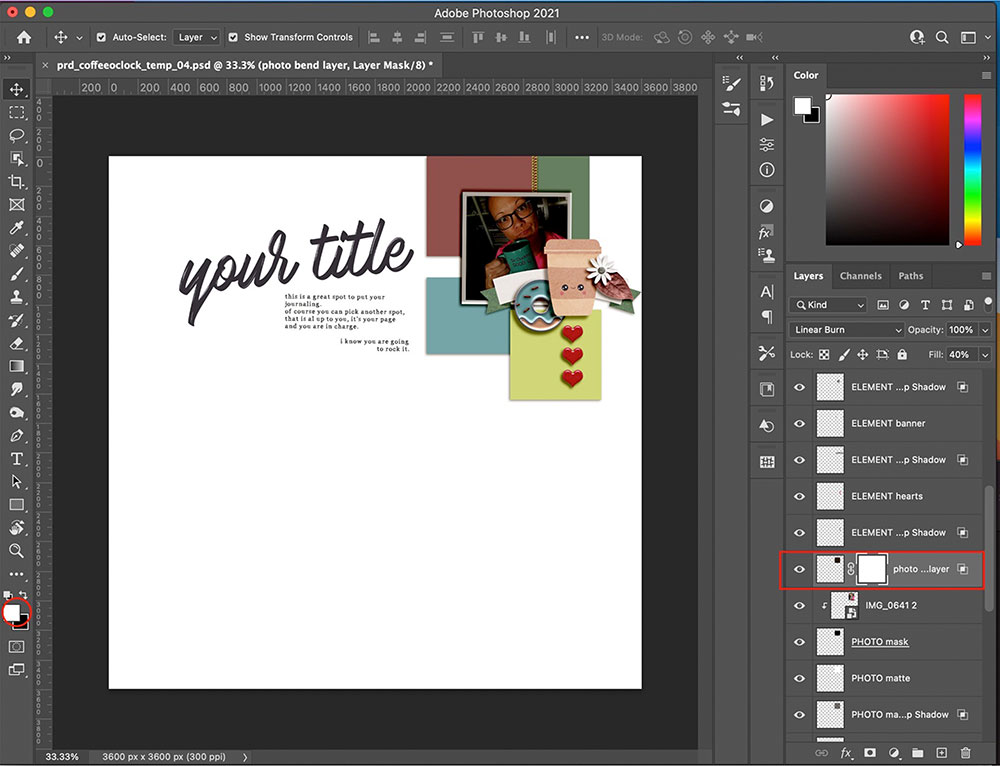
Now we have another photo matte layer. I went ahead and renamed it to "photo bend layer" so that way I know I'm working with the correct layer.

Next, I select that layer and drag or move it to where it is layered right on top of the photo. Also, notice how this layer looks on top of the photo.

Once the "bend" layer is moved up over the photo, the photo will look something similar to this.

If you notice, the shadow matches the original photo matte shadow. That is a good thing.....that is important for the "bend" to look like it belongs. I only need to make one slight adjustment to this "bend" layer. I need to move it up, so that it's overlapping the top edge of the photo/matte. This will help create that optical "bend" illusion. Selecting the "bend" layer, I then use my up arrow key to nudge this layer up. Now, I'm going to apply a layer mask to this "bend" layer. First select the "bend" layer and then go down and select the "layer mask" icon (see the icon circled below).

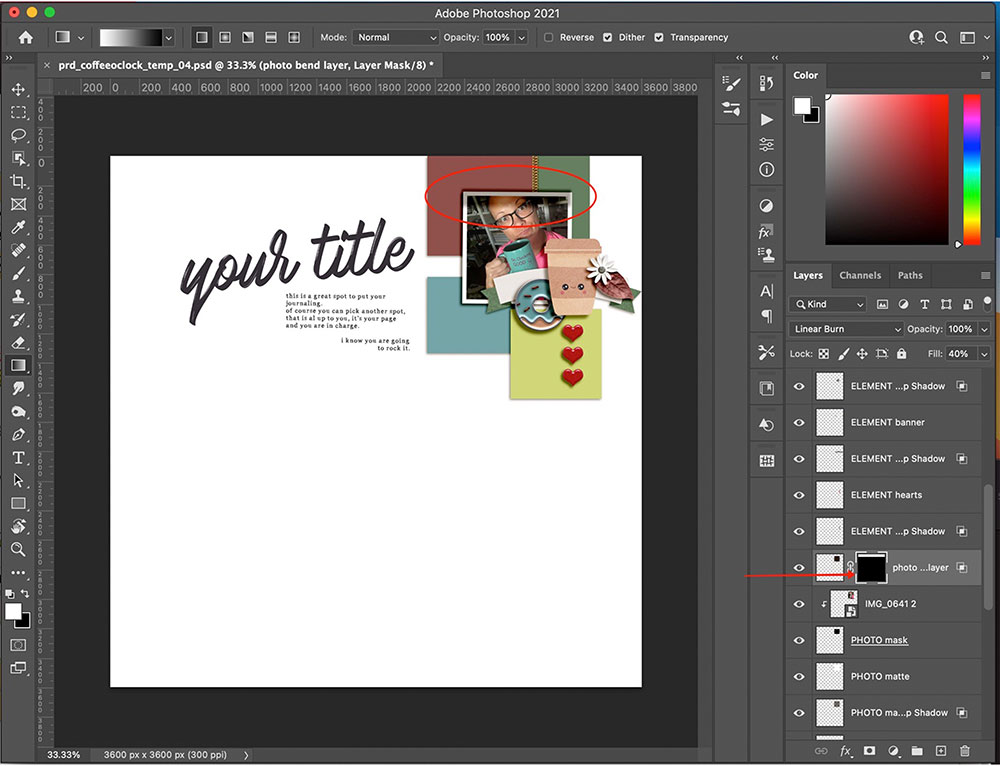
Your "bend" layer should now look like this. Before we go further, we need to make sure the foreground color is set to "white" (see on the lower left below).
Once the foreground color is set to "white," with the "bend" layer mask selected (notice where the white lined rectangle is at on the "bend" layer), click on the "gradient" tool.

Now, it's time to apply this gradient blend to the layer mask (this is why the "layer mask" of the "bend layer" has to be selected). I take my mouse and I click on the actual "bend" layer starting about 1/4 inch from the top of the layer and drag my mouse down just a little bit. (I've placed and x on the example as guidance for you ).

By bringing the mouse straight down just like an 1/8th of an inch, it forces the rest of the "bend" layer to be hidden (which is what we want). I've circled what the "visible" part of the "bend" layer and when you look to the right, you can see on the layer mask portion of this layer, the part that is "hidden."
Now, we just make adjustments to the blend mode/opacity to make this "bend" look more realistic. Start with making sure the "bend" layer is selected. I like to leave the blend mode at "linear" burn (you can play with modes and fine tune to your preference). First thing I adjust is my fill % and I dropped mine from 40% to 35%. Sometimes messing with the opacity too much can mess the look up, so I only made a slight adjustment to the opacity and dropped it from 100% to 90%.

Take a look at the top edge of the photo....by nudging the "bend" layer up over the edge, it helped aid in the illusion that the edge is curled/bent slightly by causing some additional shadowing along the top between the BG and the photo and then there’s the actual shadowing on the photo. Kinda cool, huh?
Here's what my complete layout looks like. I also used "Coffee O'Clock" for the rest of the layout.

Hope you enjoyed this tutorial, can't wait to see you try this technique. When you do, make sure you tag Mirjam and myself ("mywisecrafts") in the forum so we can leave you some love. If you post it on social media, you can also tag "Pink Reptile Designs" & "mywisecrafts" there as well and we will leave you some love as well.
Catch you around the gallery!!!
xxxxx,
Esther (mywisecrafts)


