Would you like to react to this message? Create an account in a few clicks or log in to continue.


HomeHome  Latest imagesLatest images  RegisterRegister  Log inLog in  


 July 2021 Blog Post Calendar

Go down 
+2
mirjam
Karen W
6 posters
AuthorMessage
RikkiD

RikkiD


Posts : 696
Join date : 2017-05-17

July 2021 Blog Post Calendar Empty
PostSubject: July 2021 Blog Post Calendar   July 2021 Blog Post Calendar I_icon_minitimeThu Oct 08, 2020 7:34 pm

Due 01.07. for 06.07. Tutorial by Esther SCHEDULED
Due 08.07. for 13.07. Inspo Cindy SCHEDULED
Due 10.07. for 15.07. Challenge Karen
Challenge should be posted 30.06. for CT. Layouts due 10.07.
Due 15.07. for 20.07. Hybrid Geraldine SCHEDULED
Due 22.07. for 27.07. Pretty pages Rikki
Back to top Go down
Karen W

Karen W


Posts : 385
Join date : 2016-06-18

July 2021 Blog Post Calendar Empty
PostSubject: Re: July 2021 Blog Post Calendar   July 2021 Blog Post Calendar I_icon_minitimeFri Jun 25, 2021 2:50 am

Working on a fairly simple challenge for July - 2021 is the International year of Fruit and Veg (who knew?) so it will be a theme challenge - maybe even a recipe one again. I'm away this weekend so will post something next week - it's summer hols in most places so a nice easy challenge is in order I think. Does that sound ok?
Back to top Go down
mirjam
Admin
mirjam


Posts : 13920
Join date : 2010-02-12
Location : netherlands

July 2021 Blog Post Calendar Empty
PostSubject: Re: July 2021 Blog Post Calendar   July 2021 Blog Post Calendar I_icon_minitimeFri Jun 25, 2021 10:01 am

I love the idea Karen!!!! :thumbsup:
Back to top Go down
https://pinkreptiledesigns.forumotion.com
RikkiD

RikkiD


Posts : 696
Join date : 2017-05-17

July 2021 Blog Post Calendar Empty
PostSubject: Re: July 2021 Blog Post Calendar   July 2021 Blog Post Calendar I_icon_minitimeFri Jun 25, 2021 7:23 pm

And there are some awesome kits for that theme as well!
Back to top Go down
mirjam
Admin
mirjam


Posts : 13920
Join date : 2010-02-12
Location : netherlands

July 2021 Blog Post Calendar Empty
PostSubject: Re: July 2021 Blog Post Calendar   July 2021 Blog Post Calendar I_icon_minitimeFri Jun 25, 2021 8:19 pm

that's right :)
Back to top Go down
https://pinkreptiledesigns.forumotion.com
Mywisecrafts

Mywisecrafts


Posts : 254
Join date : 2021-01-18

July 2021 Blog Post Calendar Empty
PostSubject: July Tutorial-Making a Confetti Brush   July 2021 Blog Post Calendar I_icon_minitimeSat Jun 26, 2021 11:57 pm

Hello Everyone! Esther back here with you again! Hope you are ready for another fun (I hope you find it fun) tutorial. I’m back with some inspiration from a paper layout. I loved this look created with confetti. I decided to scraplift this paper layout and walk you through creating your own confetti digitally! (I will be using PSCC 2021 for my layout and to create the confetti).

July 2021 Blog Post Calendar Paper-10

In Photoshop, I started with a 200 x 200 square canvas at 300 px. I kept my color mode as RGB since I made this for digital use.

July 2021 Blog Post Calendar 112

I then added a layer to use to create the actual confetti brush pattern. I clicked on the “+” sign in the lower right hand corner to add a layer.

July 2021 Blog Post Calendar 212

After creating the layer, I then selected a hard brush that comes standard with Photoshop. You can select the hard brush by clicking on your brush icon, if you don’t have it, then you can add it by selecting “window/brush” and you will see it added to your menu bar.

July 2021 Blog Post Calendar 412

After selecting the hard brush, I then tweaked the size to my preference. I chose my size to be 40 px as I felt that was a good
representation of actual confetti size. Before I add some circles to my canvas, I made my foreground color a darker gray.

July 2021 Blog Post Calendar 512

I then just added random circles to my canvas.

July 2021 Blog Post Calendar 612

Then I adjusted my brush size to 35 px and made my foreground color a lighter gray. I’m doing this so that I can have variation in color later on when I apply color.

July 2021 Blog Post Calendar 712

After applying the lighter shade of gray, I then added some random circles to my canvas in this new size/color. After adding the lighter gray circles, I selected this entire layer.

July 2021 Blog Post Calendar 812

With the layer selected, I then made it into a brush preset by going to "edit/define brush preset."

July 2021 Blog Post Calendar Image_11

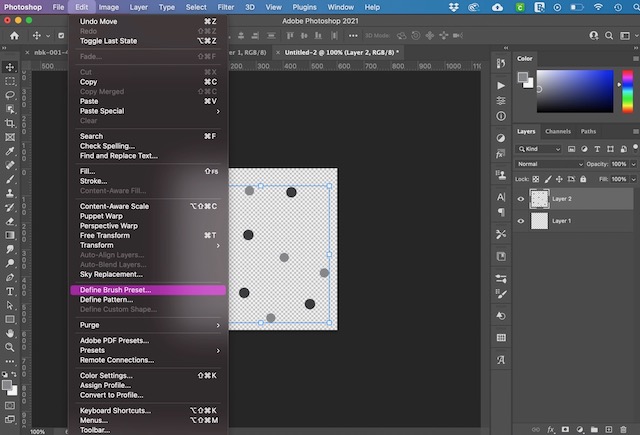
I named the brush as “circle confetti brush” and hit enter. (You can choose to pick any name to your preference.)

July 2021 Blog Post Calendar 1010

The brush isn’t finished yet. There are some preset adjustments that need to be made. Before I made adjustments I turned off (unselected) this layer so that the “brush template” is hidden.

July 2021 Blog Post Calendar Screen10

Next, I added a new blank layer, as a layer is needed to be able to make the appropriate adjustments to the brush.

July 2021 Blog Post Calendar Screen11

Then, I selected my new brush preset that I just created. I did this by selecting the brush palette and scrolling down and selecting the brush preset that I created above.

July 2021 Blog Post Calendar Screen12

Once the brush is selected, I then navigated to the brush setting tab. (If you don’t have a tab for brush settings showing, you can add it by going to window & selecting brush setting).

July 2021 Blog Post Calendar Screen13

On this tab, I made the following settings to my brush (you can also play with these setting to make them to your preference). First thing I did was ensure that smoothing is checked. This allows the brush stroke to not appear choppy when you are using it and it will give that confetti a more realistic look as well.

July 2021 Blog Post Calendar Screen21

Next, I adjusted the color dynamics. I checked the box next to it and I also selected this option so that it allowed that full screen of detail to open up. Once it was opened up, I then “checked” apply per tip (this allows the color to change as we are using the brush and give you nice mix of colors based on your main color choice). I also adjusted the foreground/background color jitter to 50%. This will be important when I select colors later on. I also adjusted the hue jitter to 35% (the more you increase this jitter the additional colors it will pull in). I want to keep my color hues in the same range as my foreground/background color ranges so I decided to not go greater than 35%. (this was determined by changing the setting and determining what I wanted to see).

July 2021 Blog Post Calendar Screen15

I then adjusted scattering. By adjusting the scatter, I control the look and can make it look more seamless and smoother or I can make it look more pronounced brush strokes. It really is a personal preference. Here’s what the scatter looks like before any adjustments:

July 2021 Blog Post Calendar Screen17

When I adjust the scatter percentage to 100%, here’s what it looks like. This is the look that I like and used.

July 2021 Blog Post Calendar Screen16

Now, when you look at this brush scatter pattern, you see some pronounced repeating of the more opaque white confetti as shown in the example.

July 2021 Blog Post Calendar Screen18

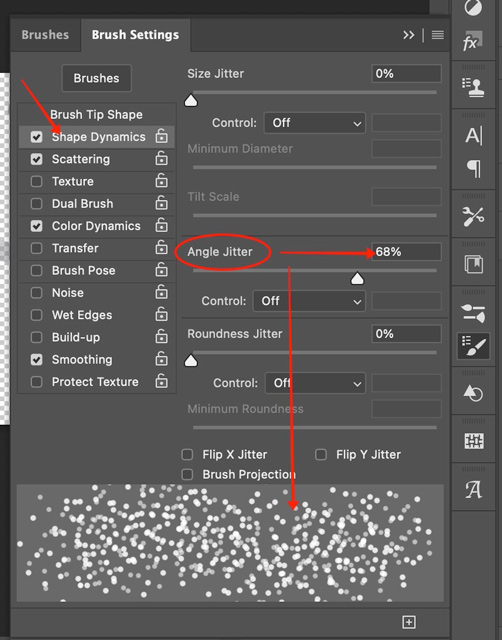
I reduced this by making the following adjustment to the angle jitter under shape dynamics. I made my angle jitter 68% as that is what I liked. I encourage you to play with this to adjust to your own preference.

July 2021 Blog Post Calendar Screen19

The next adjustment I made to the shape dynamic was to the roundness jitter. I could leave as regular circles but when I do that, it makes my confetti look too precise vs looking like falling confetti. So, I opted to make my roundness jitter 30%. There’s no science to this, I kept adjusting the jitter until I liked it (I kept doing paint layers until I found the size I liked). I left the minimum roundness jitter at the default percentage of 25%.

July 2021 Blog Post Calendar Screen20

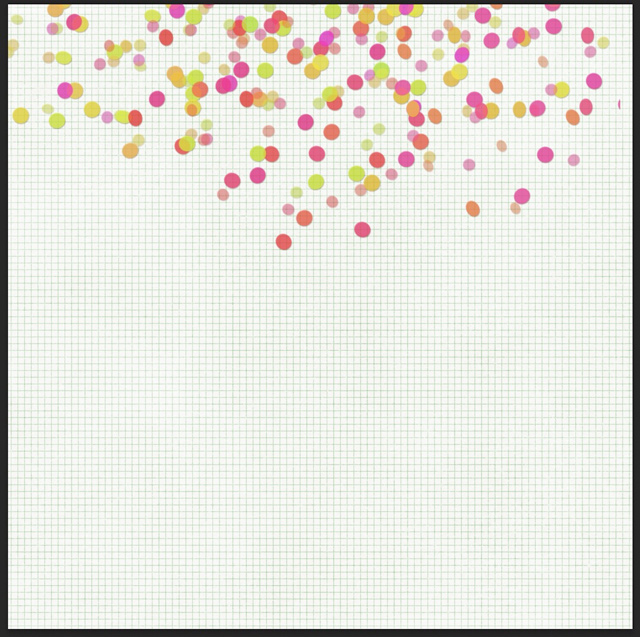
Now it’s time to select the foreground and background color. I selected these 2 colors as they match Pink Reptile Designs’ Wildflower Collection and I used this Collection for my layout. (After I selected the color, I painted them on the layer to provide a visual of the variation in hue as a result of the adjustment made to the hue jitter above, otherwise there wouldn't be as much variation between the red and the yellow).

July 2021 Blog Post Calendar Screen22

The confetti brush is good to go. I then started building my layout. I'm sharing how I created the first half of my layout as I did a lot of layering to achieve a specific confetti look. I opened up a new window in Photoshop and made my canvas 12 x 12 in size. After selecting my background paper, I then added a blank layer to paint on my first layer of confetti using the brush I just created (I did adjust the brush size to 1200 px, feel free to adjust the sizing to your preference).

July 2021 Blog Post Calendar Screen23

If you look at this, the confetti looks very flat. I want it to look more realistic, so I added a drop shadow to the confetti. Here are the drop shadow values that I used for my look.

July 2021 Blog Post Calendar Screen25

After applying the subtle drop shadow, here is what my first layer looks like.

July 2021 Blog Post Calendar Screen26

I repeated the last 2 steps 4 more times so that I had a total of 5 layers of confetti with the same drop shadow to each layer. This is what it looks like with 5 layers of drop shadowed confetti.

July 2021 Blog Post Calendar Screen27

I know I need to add more confetti to the lower part of the page, but that placement is going to be related to my photo placement.

July 2021 Blog Post Calendar Screen28

Using a similar concept as above, I added 5 more layers of confetti with each layer having a drop shadow under the photo. When I created these layers of confetti, I used my mouse to click the confetti in place so that I could control the confetti vs painting the confetti on.

July 2021 Blog Post Calendar Screen29

Now the layout is ready for me to finish adding all the elements that I want to use.

Here’s the completed layout using elements from the Wildflower Collection. Hope you enjoyed this tutorial and can’t wait to see all the confetti you create. When you create a layout using this tutorial, feel free to tag me in the gallery or on social media so I can leave you some love!


xxxxxx,
Esther

July 2021 Blog Post Calendar Prd-bl11


RikkiD and marijke like this post

Back to top Go down
mirjam
Admin
mirjam


Posts : 13920
Join date : 2010-02-12
Location : netherlands

July 2021 Blog Post Calendar Empty
PostSubject: Re: July 2021 Blog Post Calendar   July 2021 Blog Post Calendar I_icon_minitimeSun Jun 27, 2021 6:43 pm

looooooove this!!!!! :heartshape: :loveshower: :biglove:

Mywisecrafts likes this post

Back to top Go down
https://pinkreptiledesigns.forumotion.com
Mywisecrafts

Mywisecrafts


Posts : 254
Join date : 2021-01-18

July 2021 Blog Post Calendar Empty
PostSubject: Re: July 2021 Blog Post Calendar   July 2021 Blog Post Calendar I_icon_minitimeMon Jun 28, 2021 3:31 am

mirjam wrote:
looooooove this!!!!! :heartshape: :loveshower: :biglove:

Yay! I'm glad. Thank you!

mirjam likes this post

Back to top Go down
cinderella

cinderella


Posts : 385
Join date : 2019-05-17

July 2021 Blog Post Calendar Empty
PostSubject: Re: July 2021 Blog Post Calendar   July 2021 Blog Post Calendar I_icon_minitimeThu Jul 08, 2021 12:01 pm

Photoless inspiration

Hello, scrappers!
Photoless pages are probably my favorite way of digiscrapping. Some may think that "scrapbooking" equals "memory keeping", so photos are a must, but I don't agree. You can preserve a memory with your words, and you can express your feelings with layers of (digital) paint.
There are many different kinds of photoless pages. The thing they have in common is that they do have a focal point: sometimes it's the title, an art doll, the journaling, a big quote, or even an eye-catching element.
I browsed the PRD gallery at the Lilypad and found so many beauties!

July 2021 Blog Post Calendar Full

July 2021 Blog Post Calendar Full

July 2021 Blog Post Calendar Full

July 2021 Blog Post Calendar Full

July 2021 Blog Post Calendar Full

July 2021 Blog Post Calendar Full

July 2021 Blog Post Calendar Full

July 2021 Blog Post Calendar Full

July 2021 Blog Post Calendar Full

July 2021 Blog Post Calendar Full

July 2021 Blog Post Calendar Full

And now let me tell you a secret: I'm just lazy with my photos! I back them up regularly, but they are just sitting in a big folder, with duplicates, and blurry shots, and I never seem to find what I want. That's why photoless scrapping is my thing!
And how about you? Do these pages inspire you? Do you only scrap with photos? What about those memories when you're just having too much fun to grab the camera?

RikkiD likes this post

Back to top Go down
mirjam
Admin
mirjam


Posts : 13920
Join date : 2010-02-12
Location : netherlands

July 2021 Blog Post Calendar Empty
PostSubject: Re: July 2021 Blog Post Calendar   July 2021 Blog Post Calendar I_icon_minitimeThu Jul 08, 2021 12:39 pm

Fantastic post Cindy!!!! :loveshower: :heartshape: :biglove: :burnheart:
Back to top Go down
https://pinkreptiledesigns.forumotion.com
MlleTerraMoka
CT member
MlleTerraMoka


Posts : 635
Join date : 2013-11-15
Age : 40
Location : France

July 2021 Blog Post Calendar Empty
PostSubject: Re: July 2021 Blog Post Calendar   July 2021 Blog Post Calendar I_icon_minitimeFri Jul 16, 2021 6:13 pm

I love your confettis Esther !

My hybrid blog spot is below :

I love miniatures and dioramas ! I wanted to create one inside a box.
I used Frolic|papers and Frolic|elements, because I loved the colors of this kit.

The first step is to print all papers to obtain a beautiful shading :
July 2021 Blog Post Calendar 131

Before to begin a project, I had an idea in my mind but it's not precise. I always prefer to print as many papers and elements as possible to make sure I don't get stuck in the middle of a project.

I measured the diameter of my box and I drew circle with a compass :
July 2021 Blog Post Calendar 232

July 2021 Blog Post Calendar 332

I began by the last layer, the background. I choose a blue circle for the sky, and I glued with 3D autoadhesive foam 2 clouds and 1 mountain :
July 2021 Blog Post Calendar 433

July 2021 Blog Post Calendar 531

July 2021 Blog Post Calendar 631

Then I glued several circle to create a deeper view :
July 2021 Blog Post Calendar 729

July 2021 Blog Post Calendar 829

July 2021 Blog Post Calendar 930

I added a leaf (Frolic|elements) to decorate the landscape

I glued several flowers to finish the composition :
July 2021 Blog Post Calendar 1027

I put the 3D diorama inside the metallic box :
July 2021 Blog Post Calendar 1122

To finish, I added a butterfly :
July 2021 Blog Post Calendar 1223

I glued it on the background with a 3D foamto give deep


I decorated my box' cover

My project is done !

July 2021 Blog Post Calendar 1321

Mywisecrafts likes this post

Back to top Go down
http://mlleterramoka.canalblog.com
mirjam
Admin
mirjam


Posts : 13920
Join date : 2010-02-12
Location : netherlands

July 2021 Blog Post Calendar Empty
PostSubject: Re: July 2021 Blog Post Calendar   July 2021 Blog Post Calendar I_icon_minitimeFri Jul 16, 2021 10:07 pm

How cool!!!! I really love this Géraldine! :thumbsup: :loveshower: :biglove:
Back to top Go down
https://pinkreptiledesigns.forumotion.com
Mywisecrafts

Mywisecrafts


Posts : 254
Join date : 2021-01-18

July 2021 Blog Post Calendar Empty
PostSubject: Re: July 2021 Blog Post Calendar   July 2021 Blog Post Calendar I_icon_minitimeTue Jul 20, 2021 12:03 am

I Love this!!!


MlleTerraMoka wrote:
I love your confettis Esther !

My hybrid blog spot is below :

I love miniatures and dioramas ! I wanted to create one inside a box.
I used Frolic|papers and Frolic|elements, because I loved the colors of this kit.

The first step is to print all papers to obtain a beautiful shading :
July 2021 Blog Post Calendar 131

Before to begin a project, I had an idea in my mind but it's not precise. I always prefer to print as many papers and elements as possible to make sure I don't get stuck in the middle of a project.

I measured the diameter of my box and I drew circle with a compass :
July 2021 Blog Post Calendar 232

July 2021 Blog Post Calendar 332

I began by the last layer, the background. I choose a blue circle for the sky, and I glued with 3D autoadhesive foam 2 clouds and 1 mountain :
July 2021 Blog Post Calendar 433

July 2021 Blog Post Calendar 531

July 2021 Blog Post Calendar 631

Then I glued several circle to create a deeper view :
July 2021 Blog Post Calendar 729

July 2021 Blog Post Calendar 829

July 2021 Blog Post Calendar 930

I added a leaf (Frolic|elements) to decorate the landscape

I glued several flowers to finish the composition :
July 2021 Blog Post Calendar 1027

I put the 3D diorama inside the metallic box :
July 2021 Blog Post Calendar 1122

To finish, I added a butterfly :
July 2021 Blog Post Calendar 1223

I glued it on the background with a 3D foamto give deep


I decorated my box' cover

My project is done !

July 2021 Blog Post Calendar 1321
Back to top Go down
Sponsored content


July 2021 Blog Post Calendar Empty
PostSubject: Re: July 2021 Blog Post Calendar   July 2021 Blog Post Calendar I_icon_minitime

Back to top Go down
 
July 2021 Blog Post Calendar
Back to top 
Page 1 of 1
 Similar topics
-
» May 2021 Blog Post Calendar
» October 2021 Blog Post Calendar
» February 2021 Blog Post Calendar
» September 2021 Blog Post Calendar
» November 2021 Blog Post Calendar

Permissions in this forum:You cannot reply to topics in this forum
 :: Old Insta/FB Posts-
Jump to: