Would you like to react to this message? Create an account in a few clicks or log in to continue.


HomeHome  Latest imagesLatest images  RegisterRegister  Log inLog in  


 May 2021 Blog Post Calendar

Go down 
+2
MlleTerraMoka
Mywisecrafts
6 posters
AuthorMessage
RikkiD

RikkiD


Posts : 696
Join date : 2017-05-17

May 2021 Blog Post Calendar Empty
PostSubject: May 2021 Blog Post Calendar   May 2021 Blog Post Calendar I_icon_minitimeThu Oct 08, 2020 2:07 pm

Due 29.04. for 04.05. Tutorial Esther POSTED
Due 06.05. for 11.05. Inspo Cindy POSTED
Due 10.05. for 15. 05. Challenge Rikki (planned: RAK) POSTED
Challenge should be posted 30.04. for CT. Layouts due 10.05. POSTED
Due 13.05. for 18.05. Hybrid Geraldine SCHEDULED
Due 20.05. for 25.05. Pretty pages Karen SCHEDULED
Back to top Go down
Mywisecrafts

Mywisecrafts


Posts : 254
Join date : 2021-01-18

May 2021 Blog Post Calendar Empty
PostSubject: Layout Inspiration Tutorial   May 2021 Blog Post Calendar I_icon_minitimeTue Apr 20, 2021 5:27 am

Hi Everyone!

Before I started digitally scrapping, I was a die-hard paper scrapper.  Since, moving to the digital world, I am still very much inspired by paper layouts. At times, I still struggle with finding just the right touch digitally.  I recently decided to embrace that struggle and use it to challenge me to find ways to incorporate some of those paper scrapping concepts in a digital layout.  This is my very first tutorial as a Pink Lady and I’m going BIG.  I’m going to walk you through creating a layered .psd file that will be used as an element in my final layout.

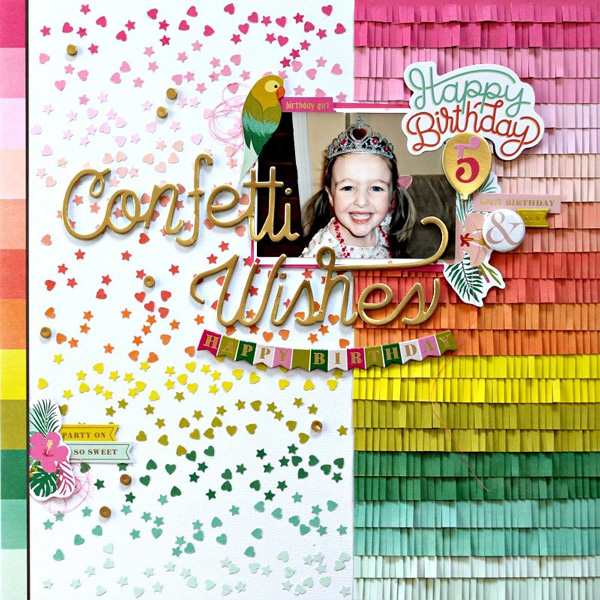
I found this particular layout on Pinterest/Scrapbook.com and fell in love with the layout, more specifically the fringe. With Cinco de Mayo right around the corner, why not be inspired by a little Mexico and let’s make some fringe!
May 2021 Blog Post Calendar Confet11


To create the fringe:
1.  Start with a 12x12 sized document in Photoshop

2.  Using the rectangle tool, I made my first piece of fringe by creating a tall slender rectangle 45px w x 450px high (feel free to use your own sizing for personal preference). I made my fill color as gray and also made sure there wasn’t any stroke applied & moved the rectangle to the edge of the left side.

3. With my first piece of fringe created, I duplicated it 3 more times to get 4 separate fringe pieces.

4. I then arranged the fringe pieces in a row where the top and bottom of the pieces are aligned and the spacing in between the fringe pieces are very minimal.

May 2021 Blog Post Calendar 110

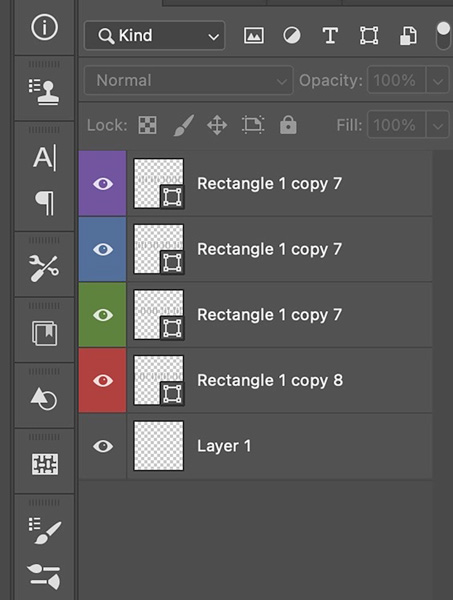
5. I then color coded each a different color. Later on, I will be combining these layers so the color code makes it easier to group them (promise, it will make sense later).  To color code the layer, I went to the layer, hovered over the “visibility/eye” icon and right clicked, this then provided me the option to choose a color, I chose red, (but feel free to choose a color of your choice).

May 2021 Blog Post Calendar 210

6. I repeated this process for each layer until I had 4 different layer color codes.

May 2021 Blog Post Calendar 310

7. The goal is to have the fringe elements go across the entire width of the canvas. The easiest way to do this is by duplicating the current fringe elements.

8. Start by selecting the fringe layers and press CNTRL + J/Command + J (shortcuts for duplicating). The duplication, stacked the copy on top of my original, so while they are still selected, I moved these elements so that they are now beside my original.

May 2021 Blog Post Calendar 510

9. Repeat steps 7 & 8 until the fringe elements go across the whole width of the canvas/page.

May 2021 Blog Post Calendar 610

10. Next, I grouped the fringe layers by the layer color code. To do this, I started with the bottom layer (I started with my red layer), while pressing CNTRL/Command, I then clicked on each layer that had the red color code.

May 2021 Blog Post Calendar 710

11. Once all the red coded layers were selected, I then merged all these layers into one layer. To do that, I pressed CNTRL + E/Command + E.

12. Repeat steps (10 & 11 for each color code).  After repeating for each color code, I was then back down to 4 color layers.
May 2021 Blog Post Calendar 810

13. I then added a band across the top like what you would normally see in fringe.  I did this by using the rectangle tool and creating a rectangle that was the width of the canvas and approximately 280 px tall (you can make this to your personal preference as well).  I made the fill gray and no stroke.

May 2021 Blog Post Calendar 910

14. I then moved the band down to overlap the top edge of the fringe. I overlapped approximately half of the band onto the top of the fringe.

15. When you look at fringe in real life, it generally doesn’t lay flat and some pieces curl up more than others.  To achieve this look, I warped color-coded layers to different degrees.

16. I selected the red layer, clicked edit from the main menu, selected transform path and then selected warp. The warp selection gives you these little “dot handles” to use to warp you image, I just nudged all the dots at the bottom of the image up slightly.

May 2021 Blog Post Calendar 10-red11

17. For the green layer, I repeated step 16 except, I nudged the dots up and very slightly to the right.

May 2021 Blog Post Calendar 11-gre11

18. For the blue layer, I repeated step 16, except, I nudged my dots up and to the left slightly.

May 2021 Blog Post Calendar 12-blu11

19. For the purple layer, I repeated step 16, except I nudged the dots on the end up and slightly to the right and 2 dots in the middle up and  slightly to the left.

May 2021 Blog Post Calendar 13-pur10

20. I then added a drop shadow to each layer except the rectangle band across the top. Since this isn’t a merged element, you want that to remain flat, so do not add a drop shadow to it.  For the fringe layers, I added the drop shadow with the following characteristics:
i. Blend mode: Linear Burn
ii. Opacity 42%
iii. Angle 90 degrees
iv. Distance 18
v. Spread 0
vi. Size 15
vii. Quality: Contour-Linear
viii. Unselect layer knocks out drop shadow

21. The completed fringe should look similar to this after the drop shadow is applied.

May 2021 Blog Post Calendar 1410

22. To save this for future use, be sure to trim and save as .psd.  To trim, select image from the menu bar/ trim/ transparent pixels. (Make sure your background doesn’t have a color layer or this won’t work).  Once trimmed, save it to your preferred location.

Note: This fringe works best as a layered .psd file/element as this approach gives the fringe a more realistic fringe look.  Also, feel free to play with the warping and shadowing and tweak to your preference.

NOW.......Let's see how this fringe looks in a layout!

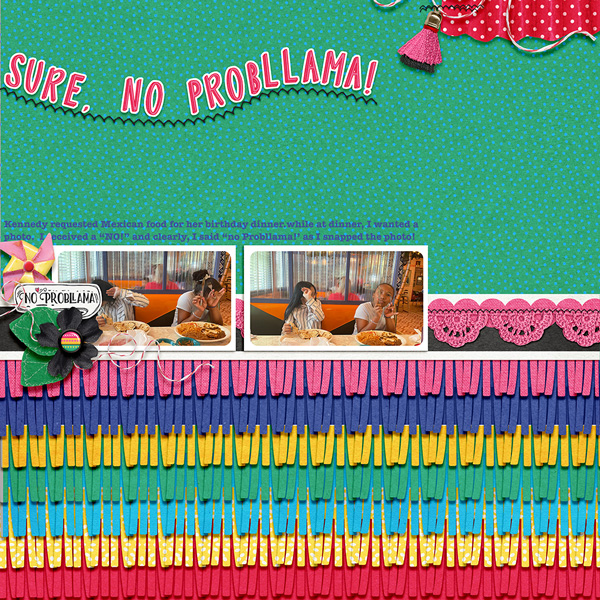
Here’s the layout I used with the fringe that I just created.  I used “No Probllama,” the entire collection for this layout.  I started with a template and added the fringe as a background element.  Each row of fringe, has all five layers present.  I clipped my paper choices to each layer in each row of fringe.

Hope you enjoyed this tutorial and have fun with this!  I hope that you give this fringe a try and can't wait to see how you make it your own!
May 2021 Blog Post Calendar Prd_no10

MlleTerraMoka and cinderella like this post

Back to top Go down
mirjam
Admin
mirjam


Posts : 13920
Join date : 2010-02-12
Location : netherlands

May 2021 Blog Post Calendar Empty
PostSubject: Re: May 2021 Blog Post Calendar   May 2021 Blog Post Calendar I_icon_minitimeTue Apr 20, 2021 9:33 am

This is AWESOME Esther!!! Super cool! Scrappers are going to LOVE this! :burnheart: :heartshape: :toottoot:

Mywisecrafts likes this post

Back to top Go down
https://pinkreptiledesigns.forumotion.com
RikkiD

RikkiD


Posts : 696
Join date : 2017-05-17

May 2021 Blog Post Calendar Empty
PostSubject: Re: May 2021 Blog Post Calendar   May 2021 Blog Post Calendar I_icon_minitimeTue Apr 20, 2021 2:46 pm

LOVE it! :burnheart:

Mywisecrafts likes this post

Back to top Go down
MlleTerraMoka
CT member
MlleTerraMoka


Posts : 635
Join date : 2013-11-15
Age : 40
Location : France

May 2021 Blog Post Calendar Empty
PostSubject: Re: May 2021 Blog Post Calendar   May 2021 Blog Post Calendar I_icon_minitimeMon May 03, 2021 8:37 pm

Spring is time of strawberries !!! And I love stramberries

This year I tried a new jam : Stramberries stem jelly.
These jam are going to offer to my kids'teachers at the end of the year.

I decided to decorate jam jars with elements from Gelato kit.

I printed some elements from Gelato|elements. I resize tags to obtain circle of 6,8 cm (the lids' size) :
May 2021 Blog Post Calendar 129

I cut these following elements to decorate the first jar :
May 2021 Blog Post Calendar 230

I began to glued the tag on the lid :
May 2021 Blog Post Calendar 330

Then I glued leaves and the stramberry with a 3D autoadhesive foam :
May 2021 Blog Post Calendar 431

May 2021 Blog Post Calendar 529

The jam jar is done !
May 2021 Blog Post Calendar 629

for the second jar, I choose these following elements that I cut :
May 2021 Blog Post Calendar 727

I glued two masking tapes :
May 2021 Blog Post Calendar 827

Then I added leaves and a second tag:
May 2021 Blog Post Calendar 928

May 2021 Blog Post Calendar 1025

To finish my clustering, I added a strawberry, with 3D autoadhesive foam:
May 2021 Blog Post Calendar 1121

I cut the masking tape to give a circle shape :
May 2021 Blog Post Calendar 1221

I glued my clustering on the lid :
May 2021 Blog Post Calendar 1319

My jars are done !
May 2021 Blog Post Calendar 1513

May 2021 Blog Post Calendar 1415

Bon appetit !

mirjam and Mywisecrafts like this post

Back to top Go down
http://mlleterramoka.canalblog.com
mirjam
Admin
mirjam


Posts : 13920
Join date : 2010-02-12
Location : netherlands

May 2021 Blog Post Calendar Empty
PostSubject: Re: May 2021 Blog Post Calendar   May 2021 Blog Post Calendar I_icon_minitimeMon May 03, 2021 9:25 pm

Oh my word Géraldine these are too cute for words! What great gifts would they make too! LOVE these! :biglove: :burnheart: :heartshape: :loveshower:
Back to top Go down
https://pinkreptiledesigns.forumotion.com
MlleTerraMoka
CT member
MlleTerraMoka


Posts : 635
Join date : 2013-11-15
Age : 40
Location : France

May 2021 Blog Post Calendar Empty
PostSubject: Re: May 2021 Blog Post Calendar   May 2021 Blog Post Calendar I_icon_minitimeMon May 03, 2021 9:32 pm

Thanks Mirjam ! :loveshower:

mirjam likes this post

Back to top Go down
http://mlleterramoka.canalblog.com
mirjam
Admin
mirjam


Posts : 13920
Join date : 2010-02-12
Location : netherlands

May 2021 Blog Post Calendar Empty
PostSubject: Re: May 2021 Blog Post Calendar   May 2021 Blog Post Calendar I_icon_minitimeMon May 03, 2021 9:39 pm

:thumbsup: :smooch:
Back to top Go down
https://pinkreptiledesigns.forumotion.com
Mywisecrafts

Mywisecrafts


Posts : 254
Join date : 2021-01-18

May 2021 Blog Post Calendar Empty
PostSubject: Re: May 2021 Blog Post Calendar   May 2021 Blog Post Calendar I_icon_minitimeTue May 04, 2021 11:52 pm

Love this!!! We might need to become BFFs!  I love doing things like this.....just haven't really tried it with digital stash...yet.

[quote="MlleTerraMoka"]Spring is time of strawberries !!! And I love stramberries

Back to top Go down
MlleTerraMoka
CT member
MlleTerraMoka


Posts : 635
Join date : 2013-11-15
Age : 40
Location : France

May 2021 Blog Post Calendar Empty
PostSubject: Re: May 2021 Blog Post Calendar   May 2021 Blog Post Calendar I_icon_minitimeWed May 05, 2021 10:39 am

Mywisecrafts wrote:
Love this!!! We might need to become BFFs!  I love doing things like this.....just haven't really tried it with digital stash...yet.

MlleTerraMoka wrote:
Spring is time of strawberries !!! And I love stramberries


:loveshower:
I can't wait your creations
Back to top Go down
http://mlleterramoka.canalblog.com
cinderella

cinderella


Posts : 385
Join date : 2019-05-17

May 2021 Blog Post Calendar Empty
PostSubject: Re: May 2021 Blog Post Calendar   May 2021 Blog Post Calendar I_icon_minitimeFri May 07, 2021 12:02 am

11.05. Inspo
May is all about flowers and wreaths, so I wanted to create a digital wreath that will stay fresh forever!
The first step was to arrange the foliage in a circle.
May 2021 Blog Post Calendar 60MOSHe
Then I added the flowers: the new BYOC "Why not" by Pink Reptile Designs includes so many flowers in various colors, that made my project a lot easier!
May 2021 Blog Post Calendar Y2ZkwqO
And since it's a digital wreath, I was able to add many other things, like strings, little bows, tags, lace, without worrying how to attach them. At this point I had 93 layers on my layout.
May 2021 Blog Post Calendar LouuMNs
The next step was to add the background papers. I chose a simple craft paper for the main background, and a beautiful floral paper as a page frame with a cutout effect (I used a style by Mommyish).
But, despite the 95 layers, my page seemed "empty", with too much white space.
May 2021 Blog Post Calendar AVIGvVR

So I played with a stock photo that cracks me up.
May 2021 Blog Post Calendar IvsL5Yx
The result is a happy spring page.

Here you can see all the steps in an animated gif. And this will probably be the theme of my next blog post! Until then, enjoy life and then scrap it!
May 2021 Blog Post Calendar HZWLqnS

RikkiD likes this post

Back to top Go down
mirjam
Admin
mirjam


Posts : 13920
Join date : 2010-02-12
Location : netherlands

May 2021 Blog Post Calendar Empty
PostSubject: Re: May 2021 Blog Post Calendar   May 2021 Blog Post Calendar I_icon_minitimeFri May 07, 2021 9:33 am

TOTALLY AWEWOME!!!! :loveshower: :biglove: :heartshape:
Back to top Go down
https://pinkreptiledesigns.forumotion.com
RikkiD

RikkiD


Posts : 696
Join date : 2017-05-17

May 2021 Blog Post Calendar Empty
PostSubject: Re: May 2021 Blog Post Calendar   May 2021 Blog Post Calendar I_icon_minitimeSat May 15, 2021 11:36 am

Mir, you put my name and photo on the blog post that is Cindy's..... Maybe you can change that at some point.
Back to top Go down
mirjam
Admin
mirjam


Posts : 13920
Join date : 2010-02-12
Location : netherlands

May 2021 Blog Post Calendar Empty
PostSubject: Re: May 2021 Blog Post Calendar   May 2021 Blog Post Calendar I_icon_minitimeSat May 15, 2021 12:54 pm

OMG I am so sorry!! It's been a difficult week personally and I noticed that I dropped the ball on some Pink Reptile stuff. Trying to get a bit of rest wher I can (i feel i need it) and trying to get things back on track.

I fixed the post btw :kiss:
Back to top Go down
https://pinkreptiledesigns.forumotion.com
RikkiD

RikkiD


Posts : 696
Join date : 2017-05-17

May 2021 Blog Post Calendar Empty
PostSubject: Re: May 2021 Blog Post Calendar   May 2021 Blog Post Calendar I_icon_minitimeSun May 16, 2021 11:52 am

No problem. :)

I just saw this after I asked you in the other thread about the challenge post. Sorry! It's not the end of the world if the challenge goes up a bit later than usual, right?
Back to top Go down
mirjam
Admin
mirjam


Posts : 13920
Join date : 2010-02-12
Location : netherlands

May 2021 Blog Post Calendar Empty
PostSubject: Re: May 2021 Blog Post Calendar   May 2021 Blog Post Calendar I_icon_minitimeSun May 16, 2021 4:39 pm

No it isn't a huge problem but I just hate it when I am not on top of things.... :gaah:
Back to top Go down
https://pinkreptiledesigns.forumotion.com
Karen W

Karen W


Posts : 385
Join date : 2016-06-18

May 2021 Blog Post Calendar Empty
PostSubject: Re: May 2021 Blog Post Calendar   May 2021 Blog Post Calendar I_icon_minitimeFri May 21, 2021 5:38 am

Hi everyone,
Hope everyone is going well! We are just heading into winter here and I'm already looking forward to spring! sigh...

But looking through the gallery has cheered me up enormously! so many gorgeous pages as usual!  

First up we have @flowersgal with her take on this months random challenge - I am a sucker for book/reading pile pages and this one certainly pops!

May 2021 Blog Post Calendar Full?d=1621101403

Next we have the lovely @Jaye I Got This- how cool is a pink, black and white colour scheme? It never seems to fail especially with a black and white photo.  The journalling is personal and hopeful! Just an all round inspiring page.

May 2021 Blog Post Calendar Full?d=1620826118

Lastly, a page featuring the wonderful collab from Fiddle Dee Dee and Pink Reptile Designs (I think I am projecting my need of warmer weather choosing this page as well!) Yum by @mum2jackaia has gorgeous photos - love a cow in a photo! and just feels so light and summery! The scatters and the heart doodles add the lightness and the blue background is perfect! Yum indeed!

May 2021 Blog Post Calendar Full?d=1620827768

So don't forget to tag your pages that you add to the Gallery with Pink Retile Designs so we can all get to show our love for them. Have a great month and see you soon!
Back to top Go down
Sponsored content


May 2021 Blog Post Calendar Empty
PostSubject: Re: May 2021 Blog Post Calendar   May 2021 Blog Post Calendar I_icon_minitime

Back to top Go down
 
May 2021 Blog Post Calendar
Back to top 
Page 1 of 1
 Similar topics
-
» October 2021 Blog Post Calendar
» January 2021 Blog Post Calendar
» August 2021 Blog Post Calendar
» December 2021 Blog Post Calendar
» April 2021 Blog Post Calendar

Permissions in this forum:You cannot reply to topics in this forum
 :: Old Insta/FB Posts-
Jump to: