A plus for digital scrapbooking is not having to get out actual “stuff” and tools to scrapbook. All you need is your computer and software, photos and stories. One of the first things we learn when playing around with the tools in PS and PSE is the ability to CUT with the Marquee tools. Draw a circle or rectangle, hit delete and
poof, you can have a cutout in your digital paper.
 1circle cutout
 by
Stacia, on Flickr
But what if you change your mind later about where that cut should be or the paper you’ve chosen? Enter a couple of less destructive ways to achieve a cut-out look.
First, we’ll talk about
INNER shadows that will
sort of embed an element into your page. I’ll demonstrate creating a circle cutout. Draw a circle with the Ellipse tool (or a square/rectangle with the Rectangle tool).
 2Inner shadow 1
 by
Stacia, on Flickr
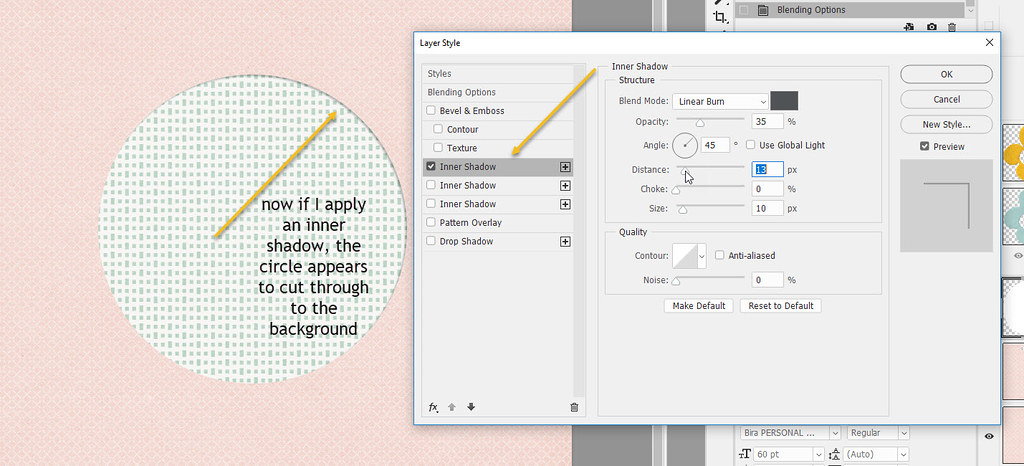
Then click on the fx/effects button at the bottom of your PS screen and choose Inner Shadow. This will bring up a dialog box.
 3Inner Shadow 2
 by
Stacia, on Flickr
As with most of our shadowing, it’s all up to personal taste. I like the look of Linear Burn instead of Multiply but it’s a very subtle difference. I like my shadows at the 45 degree angle but use your favorite angle. You’ll play with the Distance and Size sliders to achieve the depth of cut that you wish. Too high of Distance and it will look unnatural. Too high of Size and the shadow isn’t as crisp. Also pay attention to the color of your shadow, black is often way to dark. I tend to like a medium gray. For softer shadows, you can click in the blend mode color box and choose a darker shade of your paper color.
 4inner settings
 by
Stacia, on Flickr
To deepen the cut, you can add an additional Inner Shadow layer at the same angle, or a different angle to spread the shadow. In my example here, I added an additional shadow at -120 degrees, the opposite of my 45 degree layer so the shadows are on both sides.
 5dup inner shadow
 by
Stacia, on Flickr
Here is the fun part – now you can use the move tool to drag that circle anywhere on your page and the cutout moves with you! You can shrink it, expand it, duplicate the layer, or turn it off and not use it at all…
 6copy inner shadow
 by
Stacia, on Flickr
Next, we’ll look at
KNOCKOUT shadowing. The first step is deciding what you want to see in your cutout because the knockout shadow literally “cuts through” to the layer that is designated Background. If your psd file has a white layer on the bottom and you want a patterned paper in your cutout, you’ll need to move it to the bottom, rename it Background and lock it. Then, highlighting your circle shape you’ll click on the fx/effects button at the bottom of your PS screen and scroll up to Blending Options.
 7blending options
 by
Stacia, on Flickr
This will bring up a dialog box. You’ll pull the Fill Opacity slider to the left and select either Shallow or Deep in the Knockout box. The top checkbox “blend interior effects as group” will help if you add multiple shadow layers. You won’t be able to see the cutout effect until you add an Inner Shadow layer style on top of this.
 8knock options
 by
Stacia, on Flickr
Double click the fx button on your circle layer in the layers palette or use the fx/effects button at the bottom of your screen and you can add an Inner Shadow layer using the settings we used above. As before, you can add multiple Inner Shadow layers varying the settings and that will deepen or spread the shadow to your liking.
 9knock shadow
 by
Stacia, on Flickr
Now that we’ve seen both techniques used on a shape, what else could you use it for? How about a flower cutout using a flower element from one of your digital kits?
 10with an element
 by
Stacia, on Flickr
Or for titlework or word art on your page using an alpha or a font?
 11use a font both
 by
Stacia, on Flickr
 12use with alpha both
 by
Stacia, on Flickr
The possibilities are endless! You could “sink” your photo into your page, create a cutout page title, cut geometric shapes into the background, create a lacy effect, create a custom polka dot paper, use the custom shape tool for a unique cut-out element…
you name it.
I hope you’ve learned a little something new to add to your scrapping skill set.


